Sunday, February 5, 2012

DIY Seating Project

Hello, my name is Mrs. W and I am addicted to Pinterest.

Yes, it's a problem.

I find SOO many projects I want to complete the instant I repin them...but...as you can see from the title of my blog, I have a budget I must follow.

Pinterest could possibly destroy our budget if I don't learn self-control.

In order to avoid any confrontations with the husband for overspending, I need to have a legitimate reason to make something I have repined.

I was able to justify this project due to the lack of seating in our apartment.  So it's okay that we were short on money for the month of January.

Oops.

Moving on.  This is the original picture from Pinterest that inspired me!
I found the tutorial here and it was really helpful.

My first step was to find the perfect fabric.  I'm pretty much obsessed with burlap, so when I found cheap burlap here I knew that's what I had to use!

I bought two of these potato bags for $1.60 each and a yard of dark brown burlap for $3.45 from the same website (onlinefabricstore)
This is a picture of the seat without the bottom sewn on.  I cut the potato bags into four squares so that the writing wouldn't be too repetitive.  I like how it turned out.
After sewing together the four sides, I turned it inside out so the bottom piece could be sewn on.

When sewing on the bottom piece, you sew three of the sides and leave one open so the zipper can be sewn in.  Once the three sides are finished, sew on the zipper! 

To be honest...sewing on a zipper was intimidating.  I looked at several youtube videos to find one that made the most sense to me and found one here.
Once the zipper is sewn on, styrofoam beans would be the best thing to fill the seat up with.

Mine is actually not filled with those because I didn't have any money left to spend.  Oops.  I had some stuffing left over from another project, so I put that in along with a big pillow we had that wasn't being used.
You can find the beans here.  I'm not sure how many bags you would need...when I buy them I will let you know!
TADA!  The new addition to our living room!

It is used as a seat and even a footrest at times.  Perfect!

-Burlap bags: $1.60 X 2= $3.20
-Dark brown burlap:  $3.45
-Zipper from Hancock Fabric:  $3.00
-Two bags of the styrofoam beans: $30.00
- Indulging on a Pinterist project: Priceless

Total:  $39.65
(This price is a guess since I don't know how many bags of the styrofoam are needed)


Hope you enjoy!

Mrs. W

p.s.  Fabric has been purchased for Baby G's quilt I will be making! Not sure how long it will take me to make, but get excited because I will be writing a post about it!

Monday, January 23, 2012

Auntie M's Destiny


I have discovered my purpose in life.

My discovery happened today when I received the most amazing picture ever.

The sonogram of my sister's belly.  Also known as: my unborn niece.

So excited to be an aunt.

In fact, being so excited, helped me discover my purpose in life!

Ready?

I am destined to be an aunt to nieces and/or nephews AND, because I love crafts so much, I must sew and make things for my nieces and/or nephews.

Doesn't that just sound fantastic?

Forget a profession and all of that worthless stuff.  Who needs it?


You might have assumed that this post is about something I made for my new niece...you're wrong.  I just needed to rant about being an aunt and how excited I am.

I'm actually going to brag on a project I did for my brother's birthday.

I think it's awesome.  I was inspired to do it because I actually want something like it for myself.

You could say...this was kind of a trial run for what I will make for myself...just don't tell my brother. 

It might make him feel unimportant or something.  :)

So, this is what I made.  A sign my brother can hang up in his house.  

The inspiration came from a blog you can see here.

I started out by buying different sizes of plywood from Lowes and screwing them together.
I then stained the wood with Minwax in Early American from Lowes.  I had to stain it twice, just a heads up.  And, it's important to give yourself a day for the stain to fully dry.
The stain turned out beautifully!
I wanted to put a really cool phrase on it, but of course, I couldn't make a decision.  So, I decided to do something easier.

You know, something easy...like...a star!

Yeah. If you think that will be easy, you're crazy.  Just like me when I made that decision.

Completing the star was a LONG process.  I tried free handing it...that failed.

Basically, if you're going to do a star, either have a projector like the lady in the original blog, or have someone else...do the majority of the work.  That's what I did.  Thanks to my brother-in-law, we have the next picture.  He used protractors and all of that crazy stuff I haven't used since 6th grade.
Once we found the five points, I used blue painters tape to make the outline of the star as well as the center lines which, we hoped would end up making it look 3Dish.

I painted the area around the outer lines of the star as well as the assigned areas in the center of the star.

Here is the end result...well...except for the fact that it should be hanging on my brother's wall in his house.
I think it's awesome and I'm really proud of it.

There is NO way I could have done it without the help of mi familia.

I would love to give a detailed price list of this project, but it was sponsored by my parents since it's technically a birthday present from them.  I'll give an estimated amount.

-Wood (different sizes)- $25 for 8 boards
-Minwax in Early American- $8 for 1 quart
-Painters blue tape- $6
-Foam brush- $1
-Screws taken from my Dad's collection
-Screwdriver borrowed from my Dad
(Everything was purchased from Lowes)

Total:  $40.00

Hope you enjoy!

Mrs. W...or as I will be called come June 23rd, Auntie M

Monday, January 16, 2012

Christmas Productivity

I have had a month-and-a-half break from school.

Most people are jealous when they first hear how long my break is...and let me tell you, I was SOO excited and loved every minute of it...well...up until this past week.

Don't get me wrong...sleeping in until noon, doing crafts, reading, watching movies and Netflix....those are all fabulous....but after a month-and-a-half of that...you start to feel like your life is worthless.

Also, like you are super lazy.

Due to feeling worthless, I would like to give an overview of everything I completed this break, in hopes that I will feel like I was some-what productive!

While I was visiting my family in Texas we went to the most amazing flea market in Canton, Texas.  This is the most amazing place in the world. For those of you who like flea markets, I highly recommend going.  I spent a lot of money there and bought a lot of really cool things, but my favorite are the old suitcases I bought.
I've wanted to make a night stand out of vintage suitcases for a long time now and I was finally able to do it!  
Adorable. I know.

And before showing off my other creations, I must introduce the best Christmas present ever.
 This is my brand new Brother sewing machine. Ohmygoodness. It's my favorite and I love using it.
BUT it has reminded me how extremely messy I am. This is...well...was our kitchen table. Oops.

I thought it would be hard to learn how to sew but instead I have loved every minute of it.  The first thing I made was an infinity scarf, but I don't have any pictures of that.  It was SUPER easy though.

My next sewing project was a pillow that I love!
 The fabric is a khaki colored linen and then I hand sewed a doily onto the front.
I am very proud of my next sewing project because many people did not think I would do it.  

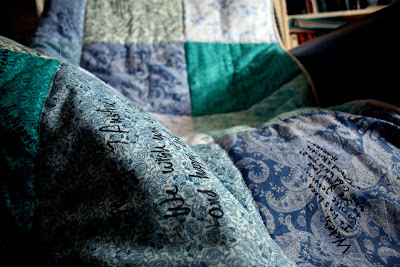
Attention please! Presenting, our wedding guest book quilt! 
I know it's almost 9 months late, but better late than never!

I guess my month-and-a-half break paid off since I was able to do a lot of projects.

And...I never thought I would say this, but I'm ready to go back to school.

Hope you enjoy!

Mrs. W

p.s. I actually finished two other projects this break that I will post about later.  One is a birthday present that hasn't been given to the person yet and the other is a sewn furniture piece for our living room.  Get excited!

Sunday, December 18, 2011

It's Pumpkin's Fault

Have I mentioned Christmas is my favorite time of the year?

Not only is Christmas music constantly playing, the tiny amount left of my pumpkin candle is melting, causing me to crave any type of pumpkin dessert.

I have three cans of pumpkin I might add.  One is the huge can too.

I looked up several pumpkin recipes and decided it was either eat amazing pumpkin-ness...and...gain more weight...OR, spend my time working on some craft to fulfill my creation desire.

So this is the craft that came of my pumpkin craving. 

And guess what?  No weight gained.

Success.

I got a cardboard "W" from JoAnn's and some red berries from Michaels....


I pulled off the berries and hot glued them to the cardboard letter.  Just a warning, some of the red came off of the berries...but I plan to color the white parts in with a red sharpie.


Then I worked on the wreath part.  I don't have any pictures of the supplies used for the wreath because I worked on it really late, sorry about that.  But this picture shows what the wreath looked like before I made it pretty.   I used a package that said, Moss Table Runner for the moss.  This is actually a bad idea because the moss smells terrible...and I would not want to smell that while eating food from a table with a moss table runner on it...but whatever! No one asked me.

Anyways, the moss table runner was great to use because it already had netting on the back that held the moss together when I cut it into sections.  Then I hot glued the moss to the wreath! This was actually not that difficult and took about an hour or so.


A friend of mine recommended that I find a way to make the cardboard letter able to be removed.  This way I can still use the moss part and put something on it for other seasons in the year.  I REALLY liked that idea, so I poked two holes in the corner at the top of the cardboard letter.  I then put green floral wire through the holes and wrapped it around the wreath. (Pictured above)

TADA! This wreath on our cheap apartment door makes it look really fancy!

Perfect.

I'm pretty much obsessed with this wreath and love it.  I've considered putting it on the inside of our door whenever I come home so that Mr. W and I can enjoy my creation...lame. I know.  I will refrain myself.

COST:

  • Moss table runner (14 feet long) from Michaels:  $8.00 (with 40% off coupon)
  • Hay wreath (18 inches) from Michaels:  $5.00
  • Cardboard "W" (approx 12inches) from JoAnn's:  $4.00
  • Berries (one bunch worked for me) from Michaels:  $5.00 (with 50% off coupon)
  • Floral wire (green) from Michaels:  $2.00 (I only used a tiny bit of this so it can be used with other projects as well)
Total:  Approximately $24.00
Time:  Approximately 2 days (only because I was lazy gluing the berries on)


Hope you enjoy!

Mrs. W

p.s.  My pumpkin candle is gone now...I have a cookie candle lit...peanut butter cookies or another craft??


p.p.s.  I accidentally deleted the original post of this...I attempted to rewrite it but wasn't able to remember things. Lame. I know.  I apologize.


Wednesday, November 30, 2011

Confessions and Christmas


Okay. I have a confession. I am a blog-a-phobe.

So. I have decided to be a professional social worker, take a quick break from the papers I should be writing, and face my fears!

I should be working on all of the final papers due this week and next week...but no. I spent all last night and the night before doing crafts.

Caught.

Oh well! I'm facing my fears, right? So that makes this okay.

Anyways. Back to the point. Christmas. I love it.

Mr. W and I went and bought our first Christmas tree and I had to make the rest of the apartment as adorable as that tree!
Now, you might be looking at our tree and thinking to yourself, "Wow! What amazing ornaments! I wonder where they got them?"

Well, I have an answer! Macye the professional social worker made them! :)

The first step is to find your mom's best friend who happened to collect cookie cutters...okay. Maybe you won't be as lucky as me, THANKS PATTI!

Then you go buy some adorable scrapbook paper from Michael's or Hobby Lobby or a place like that.

Trace the cookie cutter onto the paper. And here's the trick. you have to trace inside of the cookie cutter, not outside. I tried it outside and let's just say that cookie cutter ornament is hanging on the back of the tree.
After you trace it, cut it out and put the paper inside of the cookie cutter. Then you will hot glue the paper to the sides of the cookie cutter! Keep in mind, some of the paper I have cut is way too small for the cookie cutter, or shaped kind of funny, but when you hang it on the tree no one will notice at all. And...if they do notice...then they shouldn't be your friend.

Lastly I hot glued ribbon to the top and hung it on the tree!

Hope you enjoy!

Hopefully facing my fears will work and I will be back!

Mrs. W

Monday, May 30, 2011

Memorial Day Tradition

So, I decided to start my own blog. I love looking at other people's and thought to myself, maybe I have something to share too. Maybe I won't, but it's worth a try!

Mr. W and I were discussing our plans for Memorial Day. I didn't have school so I wanted to take advantage of the holiday to the fullest. However, with our lack of money there weren't too many options. I have been dying to bake something but with our grocery budget being used up every week I haven't had the opportunity...and I guess I haven't had the time either. I got on my absolute favorite blog to read, Joy the Baker, and found the most amazing looking cupcakes you've ever seen. My plan was to show Mr. W the pictures, causing him to see how wonderful they look and suggest I make them. Well, I ended up just asking because I was so excited about the recipe and of course the money issue came up. I ran to the pantry and took an inventory of everything we already had and everything we needed. There really wasn't that much more that we needed! When I told Mr. W this, he said "Then of course you can make it! As a tradition, you should bake a new recipe every Memorial Day!" Well, at first I was bummed since Memorial Day only happens once a year, but then reminded myself that at least I get to have a baking adventure!

So, this morning I woke up early....ok...11:00...but still. I began baking. The cupcakes are called, Chocolate, Peanut Butter Cookie Dough, Toasted Marshmallow Cupcakes. Yeah. Prepare yourself for a cupcake that will change your life.

Ok...there is nothing like having my iPad2 to read the recipe off of. Ha. And my blog title is about living on a budget...oops.

Here you go though on the budget part. Notice all of the Great Value things? Obviously except for the chocolate stuff. Can't go wrong with Hershey and Nestle.

Yummy cupcake batter.

I've learned that I'm a REALLY messy baker....gotta work on that.

These are for the peanut butter cookie dough...and as I was making this, I realized how funny it was that Joy the Baker's recipe calls for all organic ingredients...and here I am with everything Great Value. That moment is what inspired the title of my blog. :)

Here are the cupcakes!

Let me tell you. The peanut butter cookie dough with chocolate chips are probably the best I've ever had. Next time I might just make them.

This was the most difficult part, the meringue. I made Mr. W come in the kitchen and help me. We were terrified the bowl was going to shatter!

Let me introduce you to my Kitchen Aid mixer by the way. I love it. Sometimes I try to find excuses to bake just so I can use it. :)


Looks like melted marshmallows!

Good ole ziplock bag with the corner cut. I'm on a budget remember?

Broiling them to make them look like marshmallows.

A little bit of heaven.

For the recipe go to Joy the Baker's website. I just substituted everything with Great Value products, except for the cocoa and nestle semi sweet chocolate chips.

Be prepared.....during and after the creation of these cupcakes...you will most likely gain 1 million pounds.

Hope you enjoy!!!

Mrs. W